Step by step - How to configure an article?
Adjust and create configuration types
The articles collection is the first view greeting us when accessing a database. It shows selected content in a tabular form and allows us to quickly get an overview of the articles contained in the database. By default, the table shows the article’s name and the date it was last modified. However, you can easily adjust the columns to display any content of your articles.
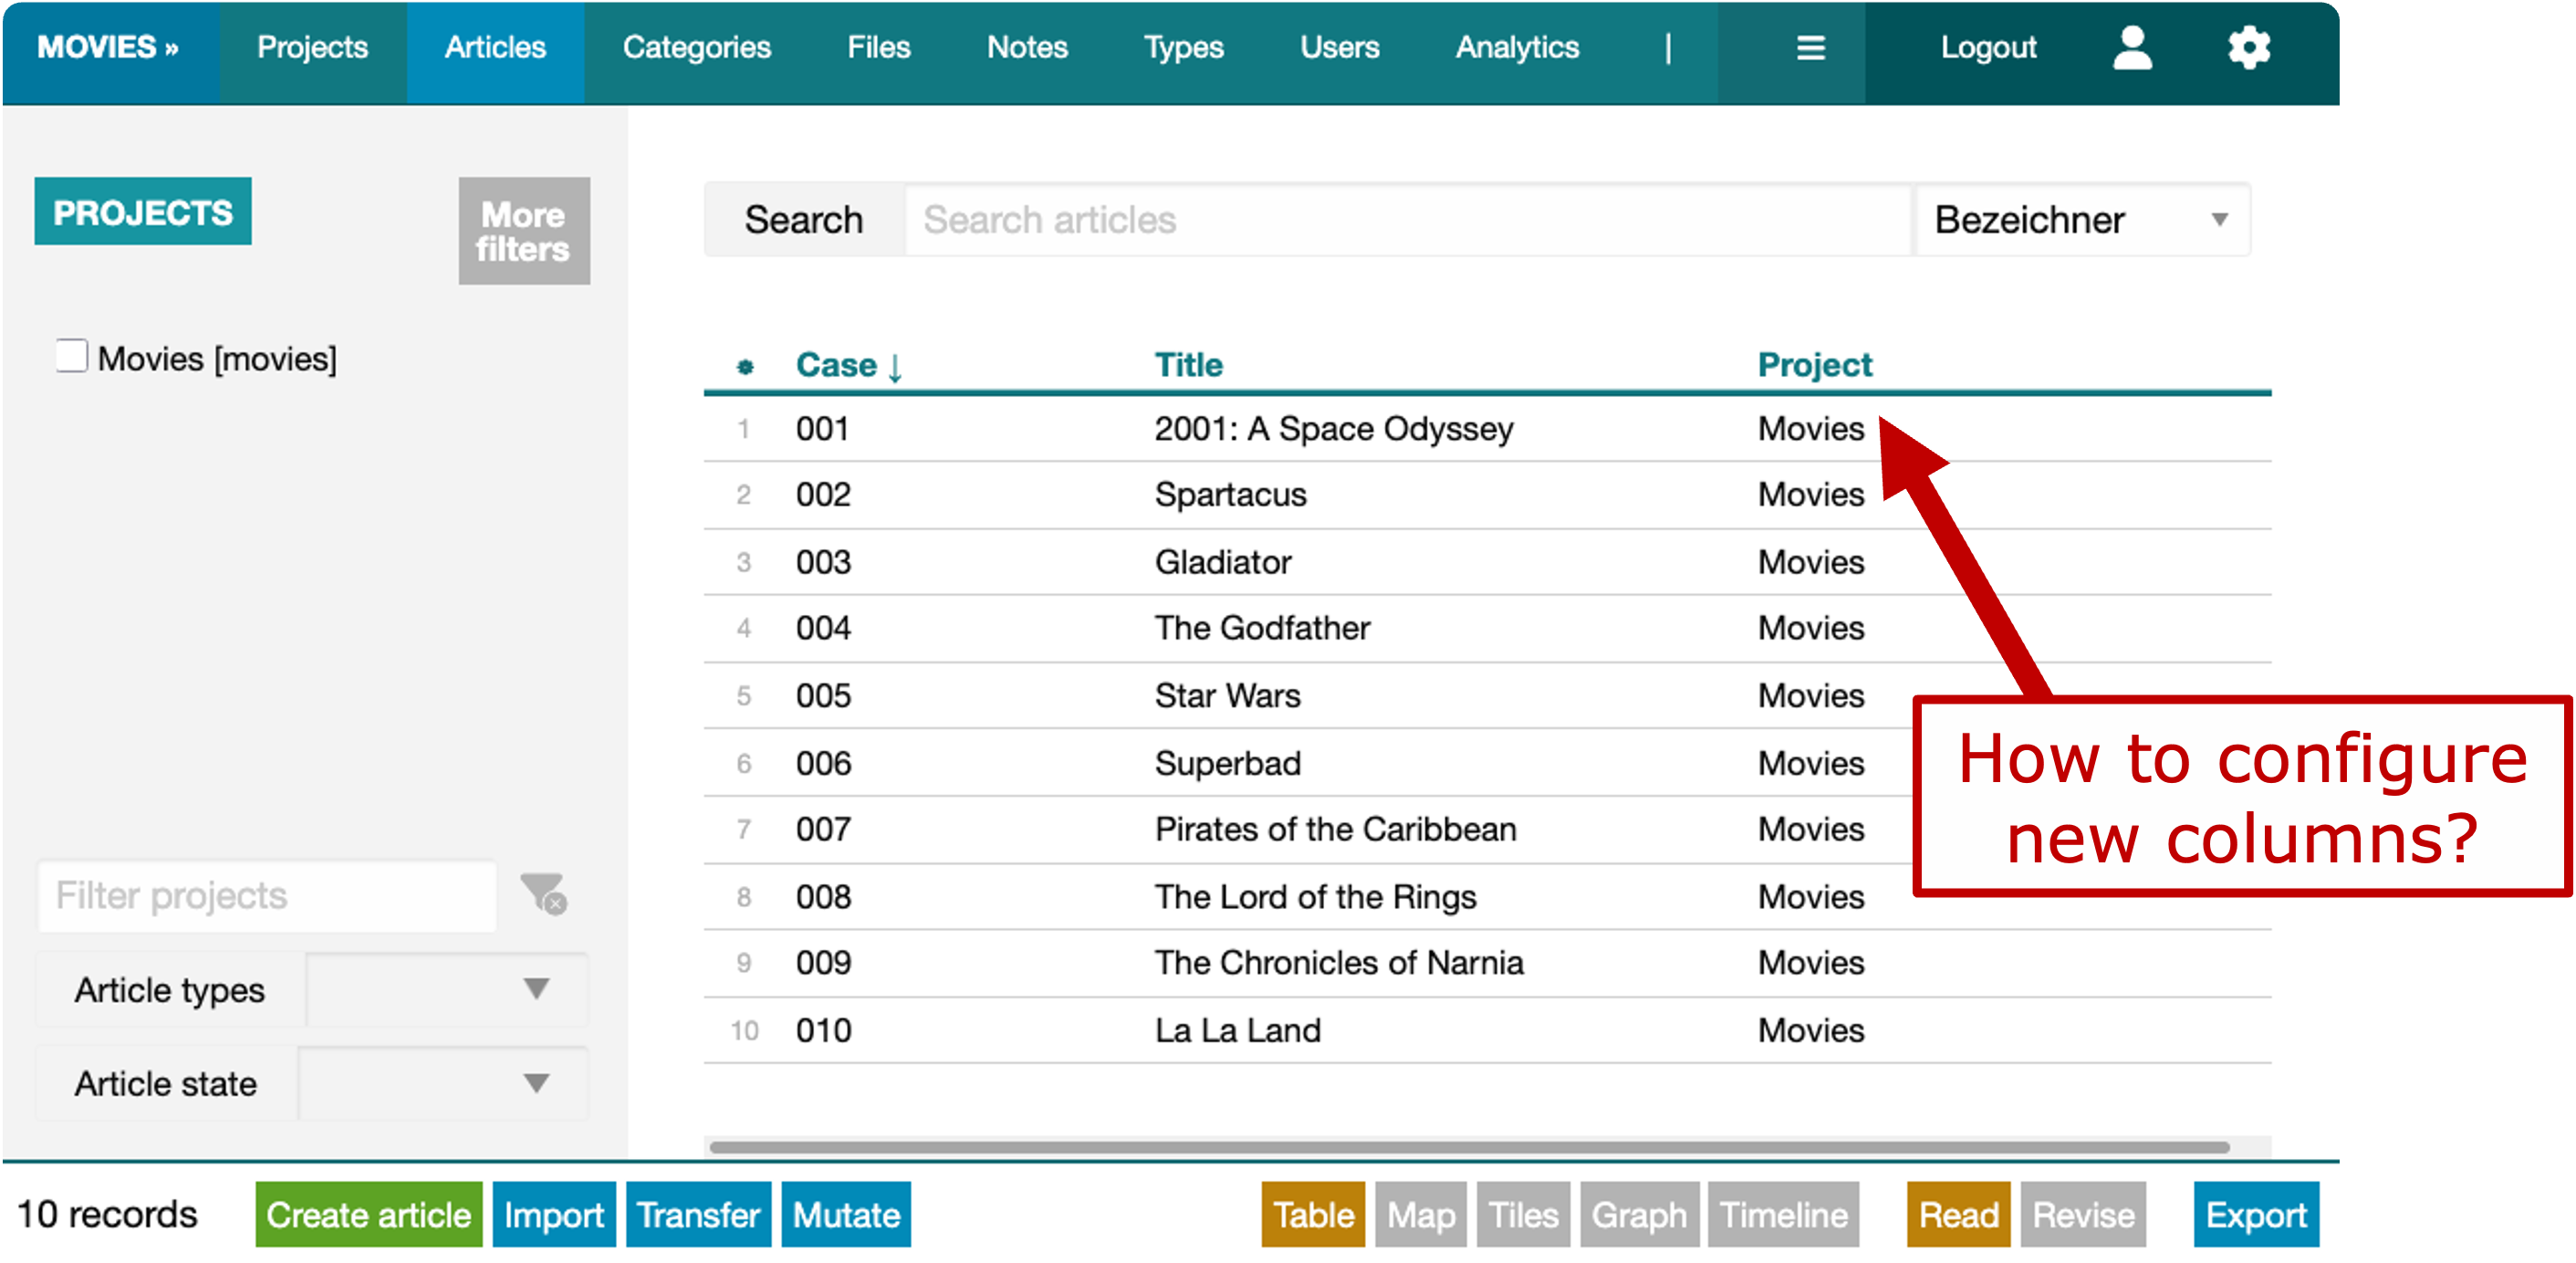
Considering a database about movies, we might want to include information such as a movie’s directors or its release dates. The following guide is based on the movies database that ships with Epigraf. You need admin permissions to create the movies database and to modify its configuration. But you can use the same techniques on other databases of your choice. You will see how to add new types of content to your articles, how to establish a new vocabulary for annotations, and how to display data in a column of the articles table.
Let’s put off configuring a new column for a moment and, diving through the RAM, consider what type configurations are needed step-by-step:

Well, think about what we are trying to achieve here: we want to display a property of a movie in the articles index, in our case the movie’s director. As we can see above, in the RAM, properties list last, with all other elements preceding them. So even though we want to add a property to our movie articles (or any arbitrary data) to display it in the index, during configuration, we run through the entire RAM from articles to properties.
There are three routes from articles to properties. You can reference properties directly in an item, annotate text with properties via the links route or use footnotes containing links to properties. Since we are assigning a property to the article as a whole and not to a specific text segment, we will take the first route.
1. Article configuration: allow a new section type within articles
The fresh movies database already contains a project type and an article type for movies. But if you open an article you will notice that it only contains sections for an abstract, genres, and images (such as movie posters). The metadata section visible in the article’s left sidebar is not a section in the RAM sense but a fixed place for fields on the article level. Here we find data such as the movie’s name and a case number.
Practically, whenever we want to add a new property to an article, we first must identify, where, as in “in what section”, editors would want to specify any given information.
In our case, the existing movies sections do not seem fit, so we will add a new section type. Instead of doing so right away, let’s mind the flow of our data model and configure an existing article type to allow for the new section first.
As a rule of thumb, try to internalise that any higher-level configuration directly influences the next lower-level element within the RAM.
Heading to the Types of our database, search for the relevant article configuration. The movies database only features one and is fairly concise in general. To find your way through more complex configurations, use the built-in filter tools to find relevant configurations, e.g. by searching the name or filtering the scope.
Select the article configuration (named “default”) and hit the Edit button in the right sidebar. You will see an input field with the configuration in JSON format. Expand the sections key and right between “text” and “genres” insert:
    "crew": {
      "type": "crew",
      "count": "1"
    },
This won’t create the new section type “crew” we are referencing, this only tells articles of the type “default” to recognise such a section type. Further the number of such sections is limited to one per article.
If you think of the RAM graph displayed above, we have configured the edge between articles and sections.
2. Sections: introduce a new section type
Now then, staying in the Types of our database, let’s configure our new section.
Click Create type in the footer. In the appearing dialogue, select:
- Scope: “sections”
- Name: “crew”
- Caption: “Crew”
- Description: “Crew of the movie”.
- Category: “Cast & Crew”
- IRI fragment: “crew”
Paste the following JSON configuration:
{
    "items": [
      {
        "type": "director",
        "count": "1"
      }
    ]
}
This configuration allows one item of the type “director”within the “crew” section. The name of the new type must match the value “director” of the type-key in our article configuration. Usually you choose the same value for caption an IRI fragment.
A description and a category are optional, they help you to keep track of you configuration as it grows. For now, you can leave all other fields as they are:
- Mode: “Default”
- Preset: “default”
- Number: “0”
Save the new section type. This will actually make it available in the articles. Although you won’t see the new section in existing articles, you can add it by clicking the green ‘+’ button in the edit view of an article. Newly created articles will already feature this currently empty section.
If you think of the RAM graph displayed above, we have configured a section as well as an edge between the section and its items.
3. Item configuration: introduce a new item type
Notice a pattern? In our new “crew” section configuration, we are referencing the item type: “director”.
Just as the section type previously, we will configure it next as it is the next lower-level RAM element.
Click Create type in the footer again and enter:
- Scope: “items”
- Name: “director”
- Caption: “Director”
- Description: “Director of the movie.”
- Category: “Cast & Crew”
- IRI fragment: “director”
Paste the following JSON configuration:
{
  "fields": {
    "property": {
      "caption": "Director",
      "format": "property",
      "types": "director"
    }
  }
}
You can leave all other fields as they are:
- Mode: “Default”
- Preset: “default”
- Number: 0
Again, the name must match the value “director” of the type-key in our section configuration.
Articles featuring a “Crew” section now contain “Director” items.
Items can have fields for text, files, datings, properties and more data types.
We just configured the property field of the item and in the types key we are referencing
the property type “director”.
Yet, editors cannot fill this field because, surprise, we are still missing the matching property configuration.
If you think of the RAM graph displayed above, we have configured an item type as well as an edge between the item type and a property type.
4. Properties: introduce a new property type
Just as before, we go on to configure the next lower-level RAM element. As we specified our item’s field to be of
format “property”, we create a new property type right away.
Click Create type in the footer and enter:
- Scope: “properties”
- Name: “director”
- Caption: “Directors”
- Description: “Director of the movie.”
- Category: “Cast & Crew”
- IRI fragment: “director”
The name must match the types value in our item configuration. Note the plural of the caption. Although you are free to choose any caption you like, we recommend the plural for property types as the captions are used in the categories menu.
Paste the following JSON configuration that defines the lemma field of the new property type:
{
  "fields": {
    "lemma": "Name"
  }
}
All other fields don’t matter by now. You can leave them as they are:
- Mode: Default
- Preset: “default”
- Number: 0
Voilà, there is our director property. Yet, looking at the drop-down selection from within the Edit view of one of our articles, there are no directors to choose from, are there?
Use the new configuration
5. Add directors as properties
To add directors to be selected in an article, let’s head to the Categories menu of our database. You will find our “Directors” category sitting under “Cast & Crew” in the navigation bar to the left.
To add a director, hit Create property in the footer and add “George Lucas” in the name field.
Add as many categories as you see fit.
Each will be available to select in the drop-down field from within our articles.
6. Adjust columns in the articles collection table
Now that we do have our director property, we can finally add a column to the articles collection table that started this journey.
Head back to the Types menu of the database and edit the default article configuration. Recognise the collapsed keys from the beginning (“fields”, “sections”, “columns”, “footnotes”), only this time expand the columns key and paste
  "director": {
    "caption": "Director",
    "default": true
  },
The default key makes the column appear on default upon reloading the articles collection table.
You did it! By now, you are practically a configuration connoisseur. Jokes aside, hopefully you have gained a better understanding of what configuring Epigraf looks and feels in practice and already have some ideas how your project might benefit.
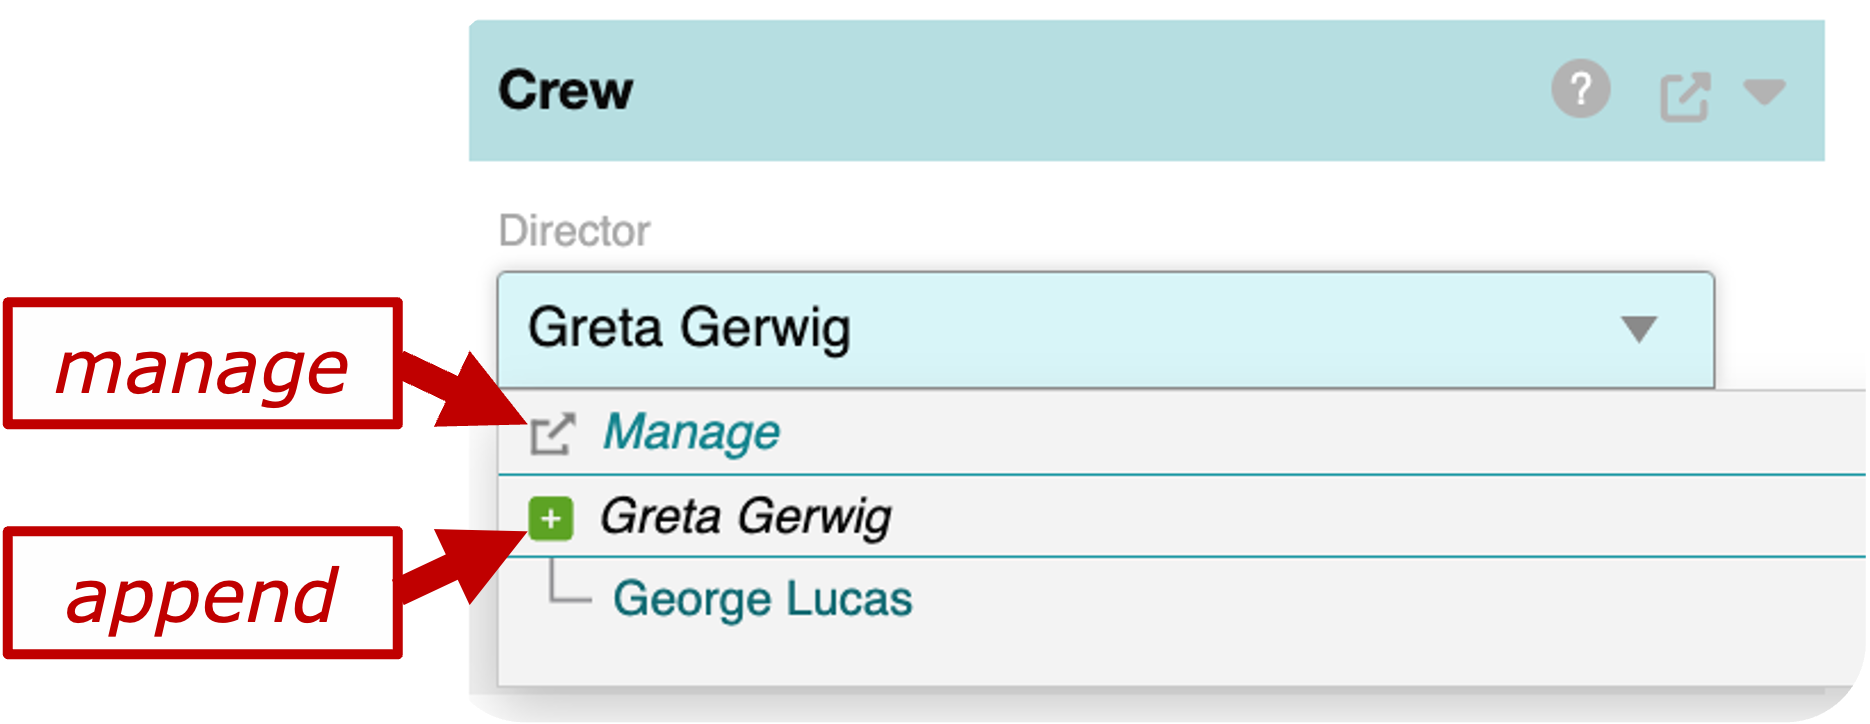
7. Manage and append properties from within articles
Haven’t had enough, have you? Here is a cherry on top. Instead of you or your editors having to switch to the Categories menu each time you want to add a new category, Epigraf features some comfort functionality.
In the item type configuration you can add append and/or manage parameters, like so:
{
  "fields": {
    "property": {
      "caption": "Director",
      "format": "property",
      "types": "director",
      "append": true,
      "manage": true
    }
  }
}
As you can see below, append allows editors to create new categories ad hoc: Simply, enter a director’s name,
and hit the green ‘+’ button.
The manage option on the other hand introduces a shortcut that upon clicking opens the Categories menu
right away and jumps to the currently selected property.
Come back anytime for reference!
What’s next?
- Familiarise yourself with the documentation for configuring articles and the related RAM elements.
- Why don’t you try to configure annotations for the movies database or your own project? Follow the step-by-step guide to get started.
- Many projects need to keep track of who is responsible for an article. Consider adding a workflow section to your articles that assigns researchers. The researchers can be stored as any other category, thus, configure a respective property type.
- To fill the new sections and items with data, you can import CSV or XML files.